Filtering Images
You can filter images by applying standard image filters, arithmetic operations, and Deep Learning models trained for denoising, super-resolution, and segmentation.
- Choose Workflows > Image Filtering on the menu bar.
The Image Processing panel appears in a contextual window that includes a preview window and the Data Properties and Settings panel.
- If required, you can import image data by clicking the Import Image Files button.
See Importing Image Files for information about importing image data.
- Add the required operations, preview their effects, and then choose the output target(s). These procedures are described in the following sections.
- If required. you can work in Advanced Mode, which lets you specify an output data type as well as work with multi-scale images (see Working with the Advanced Options).
Image filtering is one of the most fundamental operations of image processing and can greatly improve image quality and yield information that otherwise would have been missed. You should note that some filters are known for detecting or preserving edges, while others are typically used for smoothing or denoising. You should also note that filter performance is dependent both on the input image and on the parameters selected for filtering, such as kernel shape and size, iterations, and interpretation. See Image Filters and Settings for descriptions of the standard image filters available in Dragonfly and Dragonfly Pro and their settings.
Sometimes the best results may be obtained by applying two or more filters sequentially. For example, you may need to preserve edges while smoothing uniform yet noisy areas. In the Image Processing panel, you can simply add sequential filtering operations to create a composite filter. However, you should be careful to note your order of operations as some filters may be contradictory and may not always be simply applied sequentially.
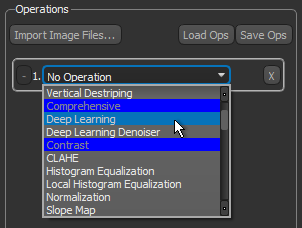
- Choose the required filter in the Operation drop-down list.
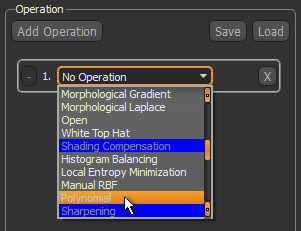
If an operations box is not available, click the Add Operation button.
- Select an input in the Input drop-down list.

An output name, based on the input dataset and selected operation, appears automatically in the Output box.
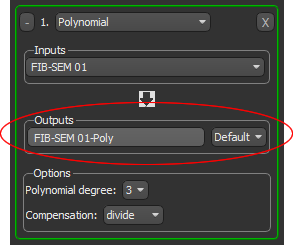
You can rename the output, if required, Simply click inside the output box and then enter the required name.

- If you are working with the Advanced Options, you can select an output data type — Default, Byte (8 bits), Unsigned Short (16 bits), Unsigned Integer (32 bits), or Float (32 bits) — if required.
Changing the output data type to float may be required to prevent unwanted loss of precision or clipping. For example, the Laplacian filter normally produces negative values. If an unsigned data type is used as the output, the negative values will be lost. This could produce an incomprehensible result. Note that "Default" is the data type of the first input.
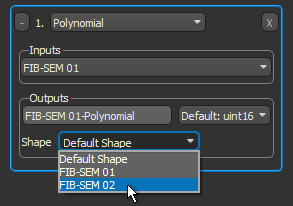
- If you are working with the Advanced Options, you can select the output geometry. You can choose the geometry of any object based on a structured grid — image data, region of interest, or multi-ROI — that is available in the Data Properties and Settings panel. You can also choose to keep the default shape, which is defined by the first input of your image processing workflow.
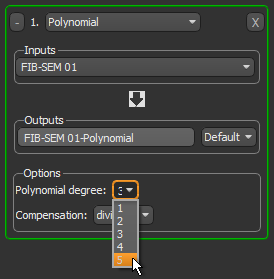
- Choose the settings for the selected filter in the Options box (see Image Filters and Settings for guidelines on selecting the filter settings).
- Scroll to the image slice you want to preview and then adjust the zoom factor, pan position, and window level, if required.
You can use the interactive text annotations or the tools on the Manipulate and Window Leveling panels to make your adjustments (see Text Annotations, Using the Manipulate Tools, and Window Leveling). You should note that previews are applied to the visible portion of the original image only.
- Synchronize the preview with the original image, recommended.
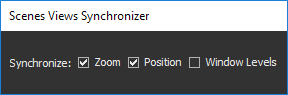
The synchronize options — Zoom, Position, and Window Level — are available on the Scenes Views Synchronizer panel, shown below.
See Synchronizing Scenes Views for information about synchronizing previews with the original image.
- Do one of the following:
- Click the Compute Selected Preview button to view the effect of the selected operation on the visible portion of the original image data.
- Click the Compute All Previews to compute and view the effect of all operations on the visible portion of the original image data.
The computed preview appears in the preview window (see Previewing Operations).
- Evaluate the effect of the selected operation on a number of representative slices.
- Add additional operations to your processing workflow, if required, and evaluate the effect of the operation.
Click the Add Operation button to add an operation. You can use the output of an operation as the input to another operation.
- Apply the selected operation or operations to the required output target (see Applying Operations).
The comprehensive filters provide the option to process image data with deep learning models trained for tasks such as denoising, segmentation, and image enhancement (see Comprehensive Filters).
You should note that a selection of trained and untrained deep learning models are available for download in the Infinite Toolbox (see Infinite Toolbox). You will need to download or create at least one model before you can access the comprehensive filters.
- Choose the required Comprehensive filter in the Operation drop-down list.
If an operations box is not available, click the Add Operation button.
- Do one of the following:
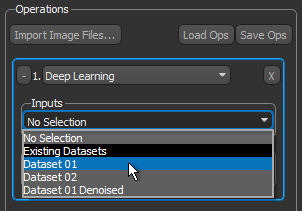
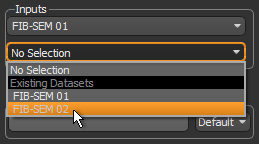
- If you chose Deep Learning, select input in the Inputs drop-down list.
- If you chose Deep Learning Denoiser, select the required inputs in the Inputs drop-down list.
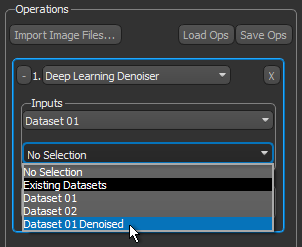
You should note that the Deep Learning Denoiser requires both the original data that you need to process and a variation of the original data that was processed with a comparable denoising filter. You should also note that the second input must have the same geometry as the first.
An output name, based on the input dataset and selected operation, appears automatically in the Output box.
You can rename the output, if required, Simply click inside the output box and then enter the required name.
- If you chose Deep Learning, select input in the Inputs drop-down list.
- If you are working with the Advanced Options, you can select an output data type — Default, Byte (8 bits), Unsigned Short (16 bits), Unsigned Integer (32 bits), or Float (32 bits) — if required.
Changing the output data type to float may be required to prevent unwanted loss of precision or clipping. For example, the Laplacian filter normally produces negative values. If an unsigned data type is used as the output, the negative values will be lost. This could produce an incomprehensible result. Note that "Default" is the data type of the first input.
- If you are working with the Advanced Options, you can select the output geometry. You can choose the geometry of any object based on a structured grid — image data, region of interest, or multi-ROI — that is available in the Data Properties and Settings panel. You can also choose to keep the default shape, which is defined by the first input of your image processing workflow.
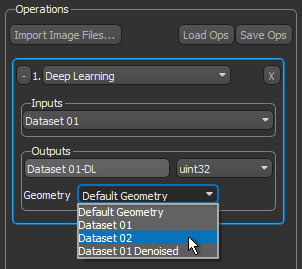
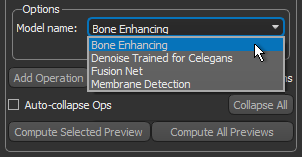
- Choose the trained model you want to use in the Model name drop-down list.
- Scroll to the image slice you want to preview and then adjust the zoom factor, pan position, and window level, if required.
You can use the interactive text annotations or the tools on the Manipulate and Window Leveling panels to make your adjustments (see Text Annotations, Using the Manipulate Tools, and Window Leveling). You should note that previews are applied to the visible portion of the original image only.
- Synchronize the preview with the original image, recommended.
The synchronize options — Zoom, Position, and Window Level — are available on the Scenes Views Synchronizer panel, shown below.
See Synchronizing Scenes Views for information about synchronizing previews with the original image.
- Do one of the following:
- Click the Compute Selected Preview button to view the effect of the selected operation on the visible portion of the original image data.
- Click the Compute All Previews to compute and view the effect of all operations on the visible portion of the original image data.
The computed preview appears in the preview window (see Previewing Operations).
- Evaluate the effect of the selected operation on a number of representative slices (see Previewing Operations).
- Add additional operations to your processing workflow, if required, and evaluate the effect of the operation.
Click the Add Operation button to add an operation. You can use the output of an operation as the input to another operation.
- Apply the selected operation or operations to the required output target (see Applying Operations).
The Arithmetic filter allows you to select a number of inputs and then write an expression to produce an output. For example, addition can be used to add components from one image into another image, subtraction can be used for change detection, and multiplication can be used to increase the average gray level of an image by multiplying it with a constant. See Arithmetic Operations for additional information about applying arithmetic operations.
- Choose Arithmetic in the Operation drop-down list.
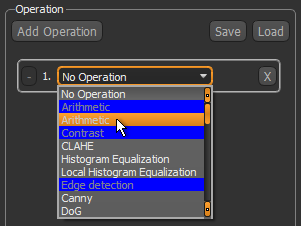
If an operations box is not available, click the Add Operation button.
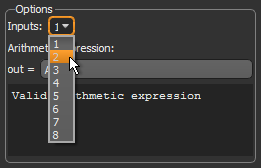
- Choose the number of inputs required for the arithmetic expression in the Inputs drop-down list.
- Select the required input(s) in the Inputs drop-down lists. Inputs can be imported image data, as well as the outputs from other current image processing operations. Unless you are working with the Advanced Options, all inputs must have the same characteristics — size, location, spacing, orientation and data type — to be used simultaneously in an image processing workflow.
An output name, based on the input dataset and operation, appears automatically in the Outputs box.
You can rename the output, if required, Simply click inside the output box and then enter the required name.

- If you are working with the Advanced Options, you can select an output data type — Default, Byte (8 bits), Unsigned Short (16 bits), Unsigned Integer (32 bits), or Float (32 bits) — if required.
To avoid any wrapping of pixel values, all calculations for arithmetic operations are done in float and all outputs are set automatically to the float data type. You should note that if you set an output as another data type when working with the Advanced options, all calculations will still be done in float. However, in such cases, the output data values may be clipped.
- If you are working with the Advanced Options, you can select the output geometry. You can choose the geometry of any object based on a structured grid — image data, region of interest, or multi-ROI — that is available in the Data Properties and Settings panel. You can also choose to keep the default shape, which is defined by the first input of your image processing workflow.
- Enter a valid arithmetic expression for the required operation (see Arithmetic Operations).
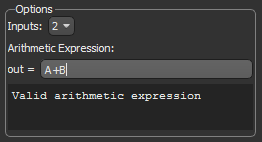
The convention for identifying each input within an expression is simply "A" for the first dataset, "B" for the second dataset, "C" for the third, and so on.
- Scroll to the image slice you want to preview and adjust the zoom factor, pan position, and window level, if required.
Note that previews are applied to the visible portion of an image only.
You can use the interactive text annotations or the tools on the Manipulate and Window Leveling panels to make your adjustments (see Text Annotations, Using the Manipulate Tools, and Window Leveling). You should note that previews are applied to the visible portion of an image only.
- Do one of the following:
- Click the Compute Selected Preview button to view the effect of the selected operation on the visible portion of the original image data.
- Click the Compute All Previews to compute and view the effect of all operations on the visible portion of the original image data.
The computed preview appears in the preview window (see Previewing Operations).
- Synchronize the preview with the original image, recommended.
The synchronize options — Zoom, Position, and Window Level — are available on the Scene Views Synchronizer panel, shown below.
See Synchronizing Scenes Views for information about synchronizing previews with the original image.
- Evaluate the effect of the selected operation on a number of representative slices (see Previewing Operations).
- Add additional operations to your processing workflow, if required, and evaluate the effect of the operation.
Click the Add Operation button to add an operation. You can use the output of an operation as the input to another operation.
- Apply the selected operation or operations to the required output target (see Applying Operations).
You can create previews in the Image Processing contextual window to evaluate the effects of applying selected operations at their current settings. This arrangement allows you to decide whether to proceed with the current filter or filter combination and their settings, or to adjust the selected filter or filter combination. Note that previews are limited to the currently displayed slice and the visible part of the image. To facilitate reviews, you can synchronize image stacking, pan position, and window leveling between the original dataset and filtering previews.
Previews for the Normalization and Histogram Balancing filters are calculated for the whole image stack. This is required in case these filters are used in a series of operations.
If you need to evaluate filtering at different steps in a series of operations, you can fuse multiple previews in the Preview window. Toggling visibility or changing opacity will allow you view the different previews.
- Select the required synchronize options for the original view — Zoom, Position, and Window Level — in the Scenes Views Synchronizer panel, recommended.
When synchronized, the preview window will be synchronized with the view of the original image (see Synchronizing Scenes Views for more information about the synchronize options).
- In the scene containing the original dataset, scroll to the image slice you want to preview and adjust the zoom factor and position, if required. Note that previews are applied to the visible portion of an image only.
You can use the interactive text annotations or the tools on the Manipulate and Window Leveling panels to make your adjustments (see Text Annotations, Using the Manipulate Tools, and Window Leveling). You should note that previews are applied to the visible portion of an image only.
- Select the operation that you want to preview, if required.
The selected operation is highlighted in the Image Processing panel.
- Do one of the following:
- Click the Compute Selected Preview button to view the effect of the selected operation on the visible portion of the original image data.
- Click the Compute All Previews to compute and view the effect of all operations on the visible portion of the original image data.
The computed preview appears in the preview window.
- Evaluate the effect of the applied operation.
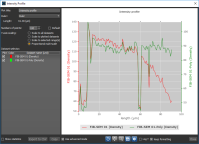
You can apply a 2D LUT to help visualize filtering effects (see 2D Settings). You can also add annotations, such as rulers and regions, to quantitatively evaluate filtering effects. For example, you can evaluate shading correction by comparing the intensity profiles of the original dataset with the filtered image (see Profiling Intensity).
- Do the following if you need to preview the effect of the selected operations(s) on different image slices or at a different point in your workflow.
- Scroll to the image slice you want to preview in the scene containing the original dataset.
- Click the Compute Selected Preview or Compute All Previews button, as required.

Processing operations can be applied by one of two mechanisms — either at the input so that the original image data is modifier, or at the output, so that a new dataset is created.
- Review the outputs that are available in the Output box. By default, each operation within an image processing workflow is added as an output and is set to create a new dataset.
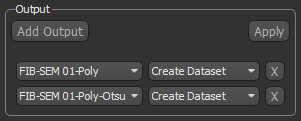
- Remove any outputs that are not needed.
To remove an output, simply click the "X" box on the right. If required, you can also add an output clicking the Add Output button.
- Choose a target for each required output — either a new dataset or at an input so that the original image data is modified.
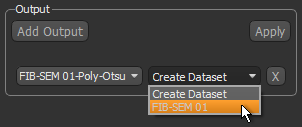
- Click the Apply button to process the selected output(s).
After processing is complete, the results will be available in the Data Properties and Settings panel.