Playing and Recording 2D Animations
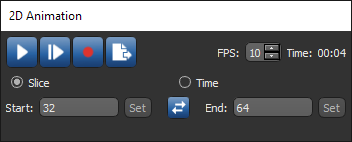
You can play and record 2D animations that scroll through the slices in a volumetric dataset or the time steps in a 4D dataset in the 2D Animation panel, shown below.
2D Animation panel
|
|
Icon |
Description |
|---|---|---|
|
Play |
|
Plays the 2D animation in the selected view, at the selected speed, interval, and direction. |
|
Resume |
|
Resumes playing the animation from the point at which it was stopped. |
|
Stop |
|
Stops playing of the 2D animation in the selected view. |
|
Record |
|
Records the 2D animation in the selected view, at the selected speed, interval, and direction. Note Recordings are made in the same resolution and the current dimensions of the selected view and can be saved in the MKV, AVI, and animated GIF file formats. |
|
Export |
|
Exports the frames of the animation as images. Export file formats include BMP, GIF, JPEG, PNG, and TIFF. |
|
FPS |
- |
Determines the number of frames per second that the animation will be played or recorded. Each frame corresponds to an image slice or time step. |
|
Time |
- |
Indicates the total time of the animation. |
|
Slice/Time |
- |
Lets you choose to record either scrolling through image slices or time steps. |
|
Start |
- |
Determines the slice number at which the animation will begin. If left blank, the scrolling will begin at the first slice in the image stack. Click the Set button to set the current slice in the selected view as the start point. |
|
Swap |
|
Swaps the set Start and End points. |
|
End |
- |
Determines the slice number at which the animation will end. If left blank, scrolling will continue to the last slice in the image stack. Click the Set button to set the current slice in the selected view as the end point. |


- Select the required 2D view and display the objects you want to be included in the animation.
- Adjust the 2D view, as required.
You can change the zoom factor and position, adjust window leveling, as well as apply a 2D LUT and interpolation (see Using the Manipulate Tools, Window Leveling, and Image Properties and Settings).
- Adjust the properties of the 2D view, as required.
You can include the scale bar, legend, and text annotations in a 2D animation, as well as change the background color (see 2D Scene's Views Properties). You can also add annotations to tell a more informative story (see Annotate Tools).
- Select the start and end points for the animation.
- To select the start point, scroll to the first slice you want to include in the animation and then click the Set button next to the Start box. You can also enter a start point manually in the Start edit box.
- To select the end point, scroll to the last slice you want to include in the animation and then click the Set button next to the End box. You can also enter an end point manually in the End edit box.
- Click the Play
 button in the 2D Animation panel.
The animation will play in a continuous loop until it is stopped.
- If required, you change the direction or speed of the animation.
- To change the direction of the animation, click the Reverse
 button.
 - To change the speed of the animation, enter a new value in the FPS text box or use the Up or Down arrows.
- To change the direction of the animation, click the Reverse
- Click the Stop
 button to stop playback.
You can record 2D animations and save them in the AVI and MKV video file formats or as an animated GIF. You should note that animations will be recorded automatically in the same resolution (dimension) as the selected 2D view. 2D animations will include the selected scene's views properties, such as the scale bar and legends, as well as annotations and regions of interest.
- Select the animation settings and preview the result as described in the topic How to Play a 2D Animation.
- Click the Record
 button.
 - Choose a File name and type — AVI, MKV, or GIF— in the Save As dialog.
- Choose a quality — from 1 (low quality) to 10 (highest quality) — if you are saving the animation as a video file.
- Click the Save button.
If required, you can export the frames of a 2D animation to a number of different image file formats, including BMP, GIF, JPEG, PNG, and TIFF. You should note that images will be exported in the same resolution (dimension) as the selected 2D view and will include the selected scene's views properties, such as the scale bar and legends, as well as annotations.
- Select the animation settings and preview the result as described in the topic How to Play a 2D Animation.
- Click the Export
 button.
 - Choose a File name and type in the Save As dialog.
- Click the Save button.
