Accessing and Adding Remote Servers
You can search for and open projects saved on remote servers that have enabled sharing and that are connected within your network.
Because the Organizer runs under the umbrella of Windows services, you may encounter certain limitations accessing network hosted data on Windows.
Windows services run under designated users, who usually don't have access to network drive mappings. This is strictly configuration related, meaning that you may run into some issues depending on how your IT department configured the network. For example, sometimes UNC (universal naming convention) notated paths won't work, other times they will. ORS has not been able to determine exactly what configuration parameters affect this or not, but we can recommend two alternate methods of accessing network data. For example, when you want to add a root on a network.
Method 1… Use normal UNC paths. A UNC path uses double slashes or backslashes to precede the name of the computer. The path (disk and directories) within the computer are separated with a single slash or backslash, as in the following example. Note that in the example below, drive letters (c:, d:, and so on) are not used.
\\servername\some_path
Method 2… If you see network errors in the Organizer logs, the workaround is to use the IP address of the network resource. In this case, the IP address of that network resource must be fixed, which is normally the case.
Instead of designating the root with UNC, for example:
\\servername\some_path
You'll need to define the root like this instead:
\\192.168.0.xx\some_path (in which 192.168.0.xx is the correct IP address).
The following is required to access and search for projects saved on remote servers within your network:
- Sharing for the Organizer must be enabled on the remote server.
- The IP address of the server that you want to access (see Accessing Network Hosted Data (on Windows)).
- The password of the remote server's Organizer, if authentication is enabled.
In addition, you must make sure that you can communicate with the remote server. In some cases, communication may be restricted by a firewall. In such cases, the port used by the remote system's Organizer must be opened. Refer to the documentation related to the firewall's security settings for more information.
- Click the Sources tab on the Organizer dialog.
- Click the Add button.
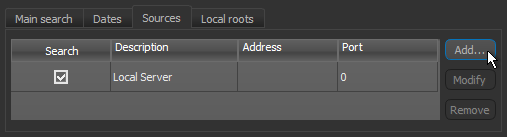
The Remote Server dialog appears.
- Do the following:
- Enter the IP address of the remote server that you want to access.
- Enter the port number used by the remote server to communicate with Dragonfly's Organizer.
- Enter a description for the remote server.
- Click the Verify button to test the connection, recommended.
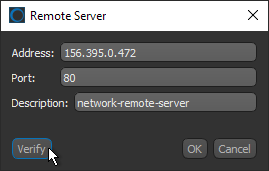
- Click OK.
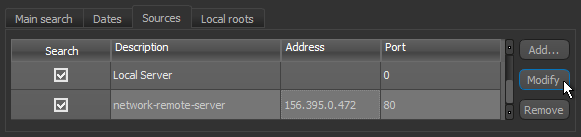
The remote server is added to the Sources list.
Note Remote servers may require authentication, in which case you will need the password when you search such servers.
- Add additional remote servers, if required.
If required, you can modify the settings of a configured remote server.
- Click the Sources tab on the Organizer dialog.
- Select the remote server that you need to modify.
- Click the Modify button.
The Remote Server dialog appears.
- Do the following, as required:
- Edit the IP address of the remote server.
- Edit the port number used by the remote server to communicate with Dragonfly's Organizer.
- Edit the description of the remote server.
- Click the Verify button to retest the connection, recommended.
- Click OK to apply your updates.
If required, you can remove a configured remote server from the Sources panel.
- Click the Sources tab on the Organizer dialog.
- Select the remote server that you want to remove.
- Click the Remove button.
- Click OK.


