Data Properties and Settings Panel
The Properties tab on the right sidebar of the Dragonfly workspace is the default location for the Data Properties and Settings panel, which lists the datasets and objects that can be shown in the scene views. For the selected object in the top section of the panel, the lower section shows related information, settings, and tools. Pop-up menus are also available that provide access to common operations, as well as to advanced features and tools.
Data Properties and Settings panel

A. Object list B. Properties, Tools, and Settings panels
You can control the visibility of datasets and other objects within a scene, as well as choose colors or LUTs for images, annotations, regions of interest, and other objects, with the icons and buttons available in the object list. You can also filter the listed items, as well as copy, import, and export objects.
The buttons at the top of the Data Properties and Settings panel filter the objects that appear in the list.
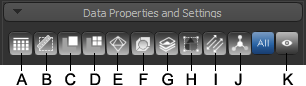
A. Images B. Annotations C. Regions of interest D. Multi-ROIs E. Meshes F. Shapes G. Overlays H. Groups I. Vector fields J. Graphs K. Visible objects
You can filter the listed objects as follows:
- Click Images to see just datasets, click Annotations to see just annotations, click Overlays to see just overlays, and so on.
- Click the All icon to show all objects that are available.
- Click Visible objects to show only objects that are visible in the current scene.
- Ctrl-click buttons to see a combination of objects.
You can control the visibility of datasets and other objects within a scene, as well as choose colors or LUTs for images, annotations, and other objects, with the icons and buttons available in the object list. Pop-up menus are also available that provide access to advanced features and tools applicable to the selected object.
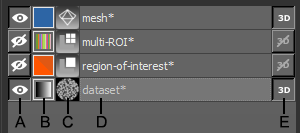
A. Visibility in scene B. LUT or color C. Thumbnail or object type D. Name E. Visibility in 3D view
Show/hide objects… You can show or hide objects in a scene as follows:
- Select a 2D view and then click the Eye icon next to the object to show or hide it in the 2D views of the current scene.
- Select a 3D view and then click the 3D icon to show or hide the object in the 3D view of the current scene
- Drag an object from the list onto a view to show it in a scene.
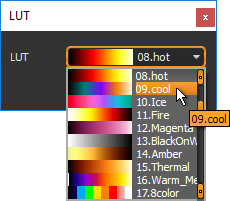
LUT/color… You can change the LUT applied to images
- Click the color box next to the object name and then choose a new color in the Color dialog (see Choosing Colors).
- Click the LUT box next to the object name and then choose a new LUT in the LUT dialog, as shown below.
Renaming objects… Do the following to rename an object:
- Double-click the name of the object and then enter a new name.
Selecting objects… Do the following to select objects in the list:
- Ctrl-click to select items one-by-one.
- Shift-click to select items within a range.
De-selecting objects… Do the following to de-select objects in the list:
- Ctrl-click a selected item to de-select it.
- Click in an empty space below the list to de-select all objects.
Reordering items… You can organize your work by reordering objects in the top section of the Data Properties and Settings panel. The arrangement of objects in the list also determines the order of visibility in a view. Objects at the top of the list are displayed over objects that are lower down. Do the following to reorder items:
- Drag the item to its required place.
Clearing all items… If you are ready to start a new workflow, you can clear all items from the Data Properties and Settings panel by creating a new session (see Starting New Sessions).
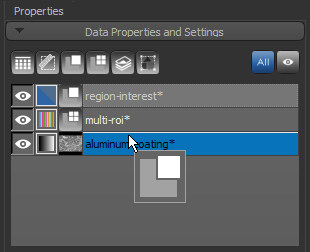
The icons directly below the object list allow you to perform common tasks on selected objects.
![]()
A. Opacity Console B. Copy C. Export D. Import E. Delete
Whenever you work in scenes that contain multiple objects, it can be time consuming to set views exactly as you want. You can quickly adjust the opacity of all objects that are visible in scene views with the co-localized opacity settings options available in the Opacity Console dialog, shown below.
Opacity Console dialog

Do the following to adjust the opacity of the objects visible in a view:
- Select the required view.
- Click the Opacity Console
 icon at the bottom of the list.
 - Adjust the opacity of any listed item with the opacity slider(s) or enter a new value in the associated edit box.
Do one of the following to copy an item listed in the top section of the Data Properties and Settings panel.
- Select the item you want to copy and then click the Copy
 icon at the bottom of the list.
 - Right-click the item you want to copy and then choose Copy in the pop-up menu.
Objects can be exported in the Dragonfly Object file (*.ORSObject extension) format, which is a proprietary binary formatted file in which data is written sequentially and XML (Extensible Markup Language) is appended after the binary data (see Exporting Objects for additional information about exporting objects). Do the following to export an object and multiple objects:
- Select the required object or objects and then click the Export
 icon at the bottom of the list.
 - Right-click the required object or objects and then choose Export in the pop-up menu.
You can import one or more objects, including image data, regions of interest, annotations, and meshes, that were saved in the Dragonfly Object file (*.ORSObject extension) format. Dragonfly Object files are proprietary binary formatted files in which data is written sequentially and XML (Extensible Markup Language) is appended after the binary data.
- Click the Import
 icon at the bottom of the list and then choose the required file in the Import Objects from File dialog.
 - Right-click inside the list box and then choose Import Objects from File in the pop-up menu. Choose the required file in the Import Objects from File dialog.
Do the following to delete an item from the top section of the Data Properties and Settings panel.
- Select the item you want to remove and then click the Delete
 icon at the bottom of the list.
 - Right-click the item you want to delete and then choose Remove in the pop-up menu.
For the selected object in the top section of the Data Properties and Settings panel, the lower section shows the properties, settings, and tools related to the type of object selected.
Refer to the following topics for more information:
Annotation Properties and Settings
Multi-ROI Properties and Settings
A number of configured actions and keyboard shortcuts are available for toggling the visibility and opacity of selected objects. The default settings for these actions are listed in the following table.
| Action | Key | Mouse |
|---|---|---|
| Set all selected objects non-visible in 2D | - | - |
| Set all selected objects visible in 2D | - | - |
| Toggle the 2D visibility of the selected objects | - | - |
|
Toggle the 2D opacity of selected datasets |
- | - |
