Adding and Editing Root Folders
Options to add, edit, and remove root folders are available in Organizer Settings dialog on the Roots panel, shown below.
Organizer Settings dialog
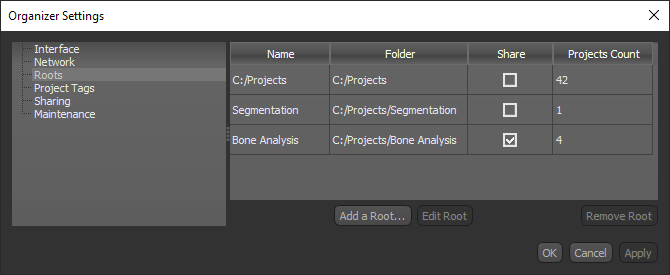
Name… Is the assigned name of the root folder.
Folder… Indicates the location of the root folder.
Share… Indicates if the folder is shared (checked) or not shared (unchecked). See Enabling Sharing for information about enabling sharing.
Projects Count… Indicates the number of projects in the folder.
You will need to add at least one root folder to the Organizer before you can create a project. You can also add multiple root folders to further organize your data, as well as to allow sharing of specific folders.
- Click the Settings button
 on the left sidebar of the Organizer dialog.
The Organizer Settings dialog appears.
- Click Roots in the Navigation pane.
The Roots panel appears in the dialog.
- Click the Add a Root button.
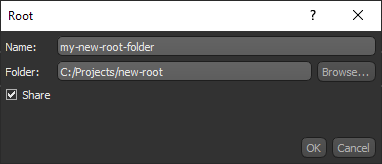
The Root dialog appears.
- Do the following, as required:
- Enter a name for the new root folder.
- Enter a folder path or click Browse and then select a folder in the Choose a Project Root Folder dialog. If required, you can create a new folder.
- Check the Share option, if you want to share the contents of the folder with other users (see Enabling Sharing).
- Click Apply or OK to save your changes.
The new root appears in the Roots panel.
A number of options are available for editing root folders. You can rename root folders, change folders, and enable or disable sharing.
- Click the Settings button on the left sidebar of the Organizer dialog.
The Organizer Settings dialog appears.
- Click Roots in the Navigation pane.
The Roots panel appears in the dialog.
- Select the root folder that you want to edit.
- Click Edit Root.
The Root dialog appears.
- Do the following, as required:
- Enter a new name for the root folder.
- Edit the folder path or click Browse and then select a folder in the Choose a Project Root Folder dialog. If required, you can create a new folder.
- Check or uncheck the Share option (see Enabling Sharing).
- Click Apply or OK to save your changes.
If required, you can remove a root folder from the Organizer.
- Click the Settings button on the left sidebar of the Organizer dialog.
The Organizer Settings dialog appears.
- Click Roots in the Navigation pane.
The Roots panel appears in the dialog.
- Select the root folder that you want to remove.
Note Whenever you remove a root folder, all data contained in the project folders will be retained.
- Click Remove Root.
- Click Apply or OK to save your changes.
